Start your own clothing line in 7 steps - this is how you do it!
Want to start your own clothing line, but have no idea where to start?
Labelfree is happy to help you! In this article you can read a detailed step-by-step plan for setting up your own clothing brand. This way you can be sure that you are well prepared!
designing your own clothing line – the options
By designing clothes yourself you can make clothes exactly the way you want them. There are two options for this, namely: use a standard product or design a product yourself. Below we explain both options to you!
1. A standard product
This is the simplest option when it comes to designing your own clothing. You then choose a standard product and can then embellish it with your own design print and/or logo. This way you don't have to have your own clothing produced right away, but you can use the stock collection. Click here to view Labelfree's stock collection.
2. Create your own design
If you would like to have your own design T-shirt or sweatshirt made that differs completely from a standard stock product, this is of course also possible and you can have your own clothing produced. Whichever option you choose. This makes your clothing unique and you determine the price yourself!
to your own clothing line in 7 steps
Before you can realize your dream collection, a number of steps need to be taken. With these 7 steps you can start a beautiful clothing line! Below we list them clearly for you;
step 1: establish your brand
What is your brand (name) and what does it stand for? What do you want to convey with your own clothing brand?
step 2: determine your target group
Which target group will buy your clothing brand? Have you already approached this target group and investigated whether they would like to buy your collection?
step 3: standard or custom made?
As already mentioned in the introduction, you can use a standard collection without a label and provide it with an original print and/or other labels. You can also consider purchasing a pressing machine yourself. This allows you to print your own clothing. Labelfree can help you purchase a new or used pressing machine. Don't want to print your own clothes yourself? No problem! We print the clothing for you.
If you opt for a custom-designed garment, the manufacturer will need an exact example/pattern and/or a graphic drawing. Private label productions are limited to certain quantities and have a longer delivery time than if you were to buy something from stock. You can also start with a standard product and later move on to a special production. At labelfree we can help you with both options.
step 4: product selection
Which product will you start with? A T-shirt or a sweater? Of course this has to do with your target group and perhaps also the time of year. Launching a warm sweater in the middle of summer may not be such a good idea. Also look carefully at which colors you choose for your own clothing line and how they fit into the fashion scene.
step 5: design your logo and neck label
If you design your own logo, also consider the different colored background of the textile on which you will print it. Do certain colors in the logo not disappear? It is important to design a strong logo that stands out on all kinds of background colors.
Designing a neck label, on the other hand, can be simpler. This is often in one or a maximum of two colors. At labelfree we deliver 200 free neck labels with an order of 100 items in total! The designs must be delivered as sharply as possible. Preferably in a vector file, formats AI, CDR, EPS, PDF (minimum 300 dpi). Also indicate which colors should be used. At labelfree we work with Pantone (PMS) colors. These are standardized colors known all over the world.
step 6: choose a printing technique
Which printing technique suits your clothing collection best?
This depends on the following:
- What is printed on? (For example cotton, polyester?)
- What is the color of the surface?
- The number of pantone colors
- What size is the print?
- How do you deliver the logo? And in what format?
- What is the position of the print?
The best printing technique is chosen based on the above information. You can consider the following techniques, among others:
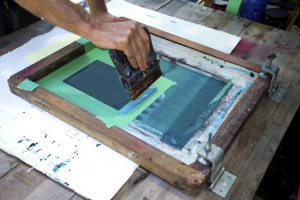
- Screen printing this is a very old Chinese printing technique. A nylon fabric is stretched onto an aluminum framework where you first make a template and use this to press the paint 'through' into the fabric. The print is then fixed by heat. The normal print size is 40 x 70 cm and exceptionally 50 x 70 cm. This printing technique is quite laborious and suitable for larger print runs and fabrics such as cotton because they can absorb the paint well. The clothing is stretched tightly and printed on a kind of carousel via the template.
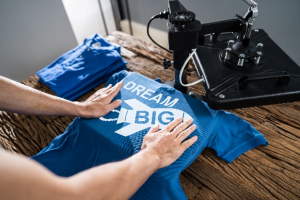
- Transfer printing Individual prints are made in editions that are subsequently printed on the clothing with a press machine. These prints are kept in stock and used as needed. The prints are industrially washable and suitable for all types of clothing. Transfers are often used for corporate clothing because you can print all kinds of clothing with them. The print is slightly more 'on' the clothing. We also make flame retardant transfers and reflex transfers. They are made in quantities of, for example, 50 pieces. The advantage is that you do not have to print 50 garments immediately and therefore have to purchase a lower stock.
- DTG 'Direct to garment' directly on the clothing. T-shirts, among other things, can be printed in a digital printing machine. This method is used for photo images and/or detailed graphic designs. This procedure is especially suitable for lower quantities and not too complicated clothing such as T-shirts.
- Litho transfer loose prints that are offset printed on transfer paper and then printed on the clothing just like with transfers. This print paint and glue is water-based and suitable for full color images. The colors are distributed in CMYK. (Cyan, magenta, yellow, key)
- Plot transfer is cut from foil and pressed onto the clothing. Ideal when it comes to smaller quantities.
- DTF Digital Print on Transfer paper and then printed on the clothing just like transfers. This procedure is also printed in CMYK and is very suitable for all kinds of images and logos. Just like transfers, they are industrially washable, the biggest difference being that because they are printed digitally, they can also be ordered in smaller numbers.
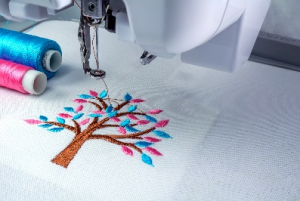
- Embroidery Here, embroidery is done directly into the clothing in a wide choice of colors. We can use a maximum of 15 colors of 'industrial washable' thread per embroidery. Embroidery is perhaps the most sustainable printing technique because it lasts longer than the clothing. An embroidery card is created for each design. The start-up is laborious and expensive and for certain purposes with a beautiful result. For repeat orders, the card has already been made and you pay proportionately less.
- Embroidery and weaving emblemsàEmbroidery and weaving emblems are either stitched or pressed onto the clothing. Embroidery badges are thicker than weaving badges. The choice is very personal.
step 7: start production
Ready to create your own clothing line? Once you have made a choice for the clothing and which printing technique you want, you will receive information from us a 'visual' quote within 24 hours for clothing and printing. This is completely without obligation!
At labelfree we offer a special sample discount. You can then request samples so that you can test and wash the clothing yourself. Then you order the desired quantities, including any decoration and neck label. The delivery time for this is approximately 2 weeks.
If you opt for a special production, we first make 'pre-production samples'. You will receive this within 4 weeks. After approval, production can also start here! This takes about 3-4 months.
good luck with your own clothing line!
We hope the above information helps you get started. When choosing the right supplier, also remember that the clothing and production meet certain requirements.
At labelfree we have been working exclusively with organic cotton for years and the clothing meets the highest standards. Important certificates for this include OEKO-TEX, GOTS, and/or OCS.
We have been working with the same producer in Bangladesh for 27 years. Together we have worked with this producer to achieve the very best quality and obtain the highest certificates. Our manufacturer has become an example for other manufacturers in the area.
We are very proud of that!
Good luck with setting up your own clothing line!
Team labelfree

Choose your samples. What colors?

Determine your target group…

Which printing technique? Screen printing?

Which printing technique? Transfer printing?

Which printing technique? Embroidery?

You can do it!


The above certificates, among others, show that the production and products meet high standards when it comes to social standards (human) and environmentally friendly products (earth).
Start your own clothing line in 7 steps - this is how you do it!
Want to start your own clothing line, but have no idea where to start? Labelfree is happy to help you! In this article you can read a detailed step-by-step plan for setting up your own clothing brand. This way you can be sure that you are well prepared!Designing your own clothing line – the options
By designing clothes yourself you can make clothes exactly the way you want them. There are two options for this, namely: use a standard product or design a product yourself. Below we explain both options to you!- A standard product
- Create your own design
To your own clothing line in 7 steps
Before you can realize your dream collection, a number of steps need to be taken. With these 7 steps you can start a beautiful clothing line! Below we list them clearly for you;step 1: establish your brand
What is your brand (name) and what does it stand for? What do you want to convey with your own clothing brand?step 2: determine your target group
Which target group will buy your clothing brand? Have you already approached this target group and investigated whether they would like to buy your collection?step 3: standard or custom made?
As already mentioned in the introduction, you can use a standard collection without a label and provide it with an original print and/or other labels. You can also consider purchasing a pressing machine yourself. This allows you to print your own clothing. Labelfree can help you purchase a new or used pressing machine. Don't want to print your own clothes yourself? No problem! We print the clothing for you. If you opt for a custom-designed garment, the manufacturer will need an exact example/pattern and/or a graphic drawing. Private label productions are limited to certain quantities and have a longer delivery time than if you were to buy something from stock. You can also start with a standard product and later move on to a special production. At labelfree we can help you with both options.step 4: product selection
Which product will you start with? A T-shirt or a sweater? Of course this has to do with your target group and perhaps also the time of year. Launching a warm sweater in the middle of summer may not be such a good idea. Also look carefully at which colors you choose for your own clothing line and how they fit into the fashion scene.step 5: design your logo and neck label
If you design your own logo, also consider the different colored background of the textile on which you will print it. Do certain colors in the logo not disappear? It is important to design a strong logo that stands out on all kinds of background colors. Designing a neck label, on the other hand, can be simpler. This is often in one or a maximum of two colors. At labelfree we deliver 200 free neck labels with an order of 100 items in total! The designs must be delivered as sharply as possible. Preferably in a vector file, formats AI, CDR, EPS, PDF (minimum 300 dpi). Also indicate which colors should be used. At labelfree we work with Pantone (PMS) colors. These are standardized colors known all over the world.step 6: choose a printing technique
Which printing technique suits your clothing collection best? This depends on the following:- What is printed on? (For example cotton, polyester?)
- What is the color of the surface?
- The number of pantone colors
- What size is the print?
- How do you deliver the logo? And in what format?
- What is the position of the print?
- Screen printing this is a very old Chinese printing technique. A nylon fabric is stretched onto an aluminum framework where you first make a template and use this to press the paint 'through' into the fabric. The print is then fixed by heat. The normal print size is 40 x 70 cm and exceptionally 50 x 70 cm. This printing technique is quite laborious and suitable for larger print runs and fabrics such as cotton because they can absorb the paint well. The clothing is stretched tightly and printed on a kind of carousel via the template.
- Transfer printing Individual prints are made in editions that are subsequently printed on the clothing with a press machine. These prints are kept in stock and used as needed. The prints are industrially washable and suitable for all types of clothing. Transfers are often used for corporate clothing because you can print all kinds of clothing with them. The print is slightly more 'on' the clothing. We also make flame retardant transfers and reflex transfers. They are made in quantities of, for example, 50 pieces. The advantage is that you do not have to print 50 garments immediately and therefore have to purchase a lower stock.
- DTG 'Direct to garment' directly on the clothing. T-shirts, among other things, can be printed in a digital printing machine. This method is used for photo images and/or detailed graphic designs. This procedure is especially suitable for lower quantities and not too complicated clothing such as T-shirts.
- Litho transfer loose prints that are offset printed on transfer paper and then printed on the clothing just like with transfers. This print paint and glue is water-based and suitable for full color images. The colors are distributed in CMYK. (Cyan, magenta, yellow, key)
- Plot transfer is cut from foil and pressed onto the clothing. Ideal when it comes to smaller quantities.
- DTF Digital Print on Transfer paper and then printed on the clothing just like transfers. This procedure is also printed in CMYK and is very suitable for all kinds of images and logos. Just like transfers, they are industrially washable, the biggest difference being that because they are printed digitally, they can also be ordered in smaller numbers.
- Embroidery Here, embroidery is done directly into the clothing in a wide choice of colors. We can use a maximum of 15 colors of 'industrial washable' thread per embroidery. Embroidery is perhaps the most sustainable printing technique because it lasts longer than the clothing. An embroidery card is created for each design. The start-up is laborious and expensive and for certain purposes with a beautiful result. For repeat orders, the card has already been made and you pay proportionately less.
- Embroidery and weaving emblemsàEmbroidery and weaving emblems are either stitched or pressed onto the clothing. Embroidery badges are thicker than weaving badges. The choice is very personal.
step 7: start production
Ready to create your own clothing line? Once you have made a choice for the clothing and which printing technique you want, you will receive information from us a 'visual' quote within 24 hours for clothing and printing. This is completely without obligation! At labelfree we offer a special sample discount. You can then request samples so that you can test and wash the clothing yourself. Then you order the desired quantities, including any decoration and neck label. The delivery time for this is approximately 2 weeks. If you opt for a special production, we first make 'pre-production samples'. You will receive this within 4 weeks. After approval, production can also start here! This takes about 3-4 months.Good luck with your own clothing line!
We hope the above information helps you get started. When choosing the right supplier, also remember that the clothing and production meet certain requirements. At labelfree we have been working exclusively with organic cotton for years and the clothing meets the highest standards. Important certificates for this include OEKO-TEX, GOTS, and/or OCS. We have been working with the same producer in Bangladesh for 27 years. Together we have worked with this producer to achieve the very best quality and obtain the highest certificates. Our manufacturer has become an example for other manufacturers in the area. We are very proud of that! Good luck with setting up your own clothing line! Team labelfreewww.labelfree.nl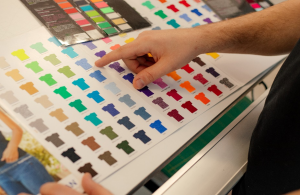

 Choose your samples. What colors? Determine your target group… Which printing technique? Screen printing?
 Which printing technique? Transfer printing? Which printing technique? Embroidery? You can do it!



 The above certificates, among others, show that the production and products meet high standards when it comes to social standards (human) and environmentally friendly products.(earth) [/av_textblock]